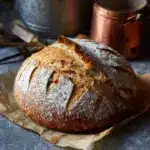
Beginners Sourdough Bread Recipe
If you’ve dreamt of baking your very first artisan loaf, Beginners Sourdough Bread is the best place to start. This recipe distills classic sourdough technique into an approachable, rewarding process so you can experience the earthy aroma, crisp crust, and chewy crumb of homemade bread—no bakery degrees required. From tangy depth to irresistible texture, every bite is a reminder that delicious, naturally-leavened bread is absolutely achievable right in your own kitchen!

Ingredients You’ll Need
You only need a handful of key ingredients for this Beginners Sourdough Bread, but each one is crucial to the final result. Simple as they may be, their interaction brings out the signature flavor, texture, and appearance that makes sourdough so special.
- All-purpose flour: The foundation of the bread’s structure, creating a tender crumb and a beautiful golden crust.
- Active sourdough starter: This is your natural leaven, introducing flavor and all the magic necessary for a lovely rise.
- Water: Hydrates the flour and helps develop gluten, giving the bread its stretchy, chewy texture.
- Salt: Balances out the tangy flavor and ensures a tasty loaf while helping strengthen the dough.
How to Make Beginners Sourdough Bread
Step 1: Prepare Your Starter
Feed your sourdough starter about 4 to 12 hours before you start the dough, giving it time to get bubbly and active. The liveliness of your starter will really make or break your loaf — so don’t rush this step! You’ll know it’s ready when it’s airy and doubles in size.
Step 2: Mix the Dough
In a large bowl, stir together the water, active starter, salt, and flour using a wooden spoon, or simply your hands (don’t be afraid to get a little messy!). The dough will be shaggy and rough at this stage — that’s totally normal.
Step 3: Rest and Hydrate
Cover your bowl loosely with plastic wrap or a lid, and let the mixture rest for 30 minutes. This “autolyse” period allows the flour to fully soak up the water, which in turn makes the dough easier to work with and results in a better crumb down the road.
Step 4: First Stretch and Fold
Reach into the bowl, grab the edge of your dough, and gently pull it upward to stretch, then fold it down over the center. Rotate the bowl a quarter turn and repeat, completing four stretches in total for one round. This develops gluten — bread science in action!
Step 5: Two More Rounds of Stretch and Folds
Let the dough rest for 30 minutes, perform another round of stretching and folding, then rest again for 30 minutes before doing a third and final round. Each set builds the dough’s structure and helps it get strong and airy.
Step 6: Bulk Fermentation
Cover your bowl again and set the dough somewhere warm. Leave it to ferment until it’s doubled in size. Depending on your kitchen conditions, this could take anywhere from 6 to 12 hours (or even longer) — watch for volume, not the clock! Avoid over-fermenting, as the dough can collapse if left too long.
Step 7: Shaping the Dough
Gently transfer your dough to a lightly floured surface. Fold it onto itself and roll into a loose log, then shape into a round by cupping and gently pulling toward you. This helps build tension on the dough’s surface, contributing to loft in the oven.
Step 8: Bench Rest and Final Shaping
Let the dough rest, uncovered, for 15-20 minutes so a skin can form — this prevents sticking. Flip it over and perform another round of folding the sides to the center to build more surface tension, then gently pinch the seams together.
Step 9: Proof in a Banneton or Bowl
Dust a banneton or a medium bowl lined with a well-floured towel (all-purpose or rice flour work). Place your dough seam-side up, cover with plastic, or slip into a bag to help it retain moisture during the long, cold proof.
Step 10: Cold or Room Temperature Proof
Pop the covered dough into your fridge for 12-15 hours if you love crisp crust and easier scoring, or let it rise at room temperature for 3-4 hours if you prefer a faster route. The cold proof develops complex sour flavor and makes the dough easier to handle.
Step 11: Preheat Your Oven and Dutch Oven
Preheat your oven and a Dutch oven to 500 degrees F for a full hour before baking. This ensures heat is intense and even, helping the bread spring up beautifully when it hits the hot pot.
Step 12: Score and Bake
Flip your dough onto parchment paper, dust with flour if you like, and use a sharp razor or bread lame to make one deep score for expansion and any extra decorative cuts your heart desires. Lower the parchment and dough into your hot Dutch oven, cover with the lid, and bake for 20 minutes, then remove the lid and reduce the oven to 475 F. Bake another 15-25 minutes, or until your loaf turns a deep golden brown with irresistible crackle.
How to Serve Beginners Sourdough Bread

Garnishes
Once your Beginners Sourdough Bread cools, try brushing the crust with a little melted butter or olive oil and a sprinkle of flaky salt for an extra nibble of flavor. Fresh herbs, roasted garlic, or even a dusting of parmesan can turn each slice into a gourmet treat, especially if you’re serving friends or family.
Side Dishes
Sourdough is the ultimate sidekick to countless meals. Pair it with seasonal soups, leafy green salads, hearty stews, or classic cheese platters. It’s unbeatable with soft scrambled eggs for brunch, or simply served alongside a bowl of olive oil and balsamic for dipping.
Creative Ways to Present
Turn your loaf into rustic crostini topped with farmers market veggies, use thick slices for gourmet grilled cheese sandwiches, or hollow out the center and use as a soup bowl! You can even cube it up and toast for croutons or serve as the centerpiece of your next bread board.
Make Ahead and Storage
Storing Leftovers
Store your Beginners Sourdough Bread at room temperature, wrapped in a clean kitchen towel or folded in a paper bag. This allows the crust to retain some crunch while preventing it from drying out. Homemade sourdough keeps best for two to three days, but trust me — it rarely lasts that long!
Freezing
If you want to save some for later, let the loaf cool completely, then wrap it tightly in plastic wrap followed by foil or a freezer-safe bag. Store in the freezer for up to three months. When you’re ready, thaw at room temperature still wrapped to prevent condensation from making the crust soggy.
Reheating
To recreate that just-baked experience, warm leftover slices in a toaster or pop the whole loaf (unwrapped) in a 350 degree F oven for 10 minutes. This refreshes the crust and revives the bread’s irresistible aroma and taste.
FAQs
How do I know if my sourdough starter is ready for baking?
Your starter is ready for Beginners Sourdough Bread when it’s bubbly, aromatic, and has about doubled in size within 4 to 8 hours after feeding. If you drop a little in water and it floats, you’re good to go!
Can I substitute whole wheat flour in this Beginners Sourdough Bread recipe?
Absolutely! You can swap up to half the all-purpose flour for whole wheat to add more flavor and nutrition. Just remember, whole wheat absorbs more water, so you may need an extra splash when mixing the dough.
My dough is super sticky. Did I do something wrong?
Sticky dough is normal for sourdough, especially with higher hydration recipes. Lightly coating your hands with water or oil while handling it can help, and try not to add too much extra flour, or you might lose that beautiful open crumb.
Is a Dutch oven necessary, or can I bake without one?
While a Dutch oven creates the best steam and heat environment for oven spring and crust, you can bake Beginners Sourdough Bread on a hot pizza stone with a metal bowl inverted over the dough for the first half of baking. Some steam is key!
Do I really need to refrigerate the dough overnight?
The overnight cold rise isn’t mandatory, but it does make the dough easier to score and gives the bread a more complex, tangy flavor. If short on time, a 3–4 hour room temp proof still yields delicious sourdough.
Final Thoughts
There’s something unbeatably satisfying about pulling your own loaf of Beginners Sourdough Bread from the oven and hearing that crackly crust sing. With this recipe, anyone can start the journey — so gather your ingredients, channel some patience (and excitement!), and get ready to wow yourself and everyone you share a slice with. Happy baking!
PrintBeginners Sourdough Bread Recipe
Learn how to make delicious sourdough bread at home with this easy-to-follow beginner’s recipe. This sourdough bread is perfect for those new to bread making and yields a crusty loaf with a soft interior.
- Prep Time: 30 minutes
- Cook Time: 45 minutes
- Total Time: 15-17 hours
- Yield: 1 loaf 1x
- Category: Bread
- Method: Baking
- Cuisine: American
- Diet: Vegetarian
Ingredients
All-Purpose Sourdough Bread:
- 475 grams all-purpose flour (3 1/2 cups)
- 100 grams active sourdough starter (1/2 cup)
- 325 grams water (1 1/3 cups)
- 10 grams salt (2 teaspoons)
Instructions
- Feed the Sourdough Starter: Ensure your sourdough starter is active and bubbly by feeding it 4-12 hours before starting the dough.
- Combine Ingredients: Mix warm water, active starter, salt, and flour in a large bowl.
- Rest the Dough: Cover and let the dough rest for 30 minutes to hydrate the flour.
- Stretch and Fold: Perform a series of stretch and fold rounds over intervals.
- Bulk Ferment: Let the dough double in size through bulk fermentation.
- Shape the Dough: Shape the dough into a ball and place in a floured banneton for proofing.
- Bake: Preheat a dutch oven, score the dough, and bake at high heat.
Notes
- You can customize the bread by adding seeds or grains to the dough.
- Experiment with different flours for unique flavors and textures.
Nutrition
- Serving Size: 1 slice (approximately 50g)
- Calories: 130
- Sugar: 0.5g
- Sodium: 240mg
- Fat: 0.5g
- Saturated Fat: 0g
- Unsaturated Fat: 0g
- Trans Fat: 0g
- Carbohydrates: 27g
- Fiber: 1g
- Protein: 4g
- Cholesterol: 0mg
Keywords: sourdough bread, homemade bread, beginner recipe, artisan bread


