Easy Reindeer Cupcakes Recipe
Introduction
Celebrate the holiday season with these adorable and easy reindeer cupcakes. Perfect for parties or festive treats, they combine your favorite cupcake base with charming chocolate antlers and colorful icing details.
Ingredients
- Your favorite cupcake recipe
- Festive cupcake liners
- Candy melts chocolate
- Wilton red icing
- Wilton brown icing
- Wilton black decorator icing
- Eyeball sprinkles
- Disposable decorating bags
- Wilton #4 decorating tips
- Wilton #10 decorating tips
- Parchment paper
Instructions
- Step 1: Preheat the oven according to your cupcake recipe’s instructions. Line a cupcake pan with festive cupcake liners.
- Step 2: Use a cookie scoop to evenly fill each liner with cupcake batter. Bake as directed, typically at 350°F for about 17 minutes.
- Step 3: While the cupcakes bake, melt candy melts chocolate in a microwave-safe bowl at 30% power in 30-second intervals until fully melted.
- Step 4: Snip the tip off a disposable decorating bag and insert a #4 Wilton decorating tip. Fill the bag with melted chocolate.
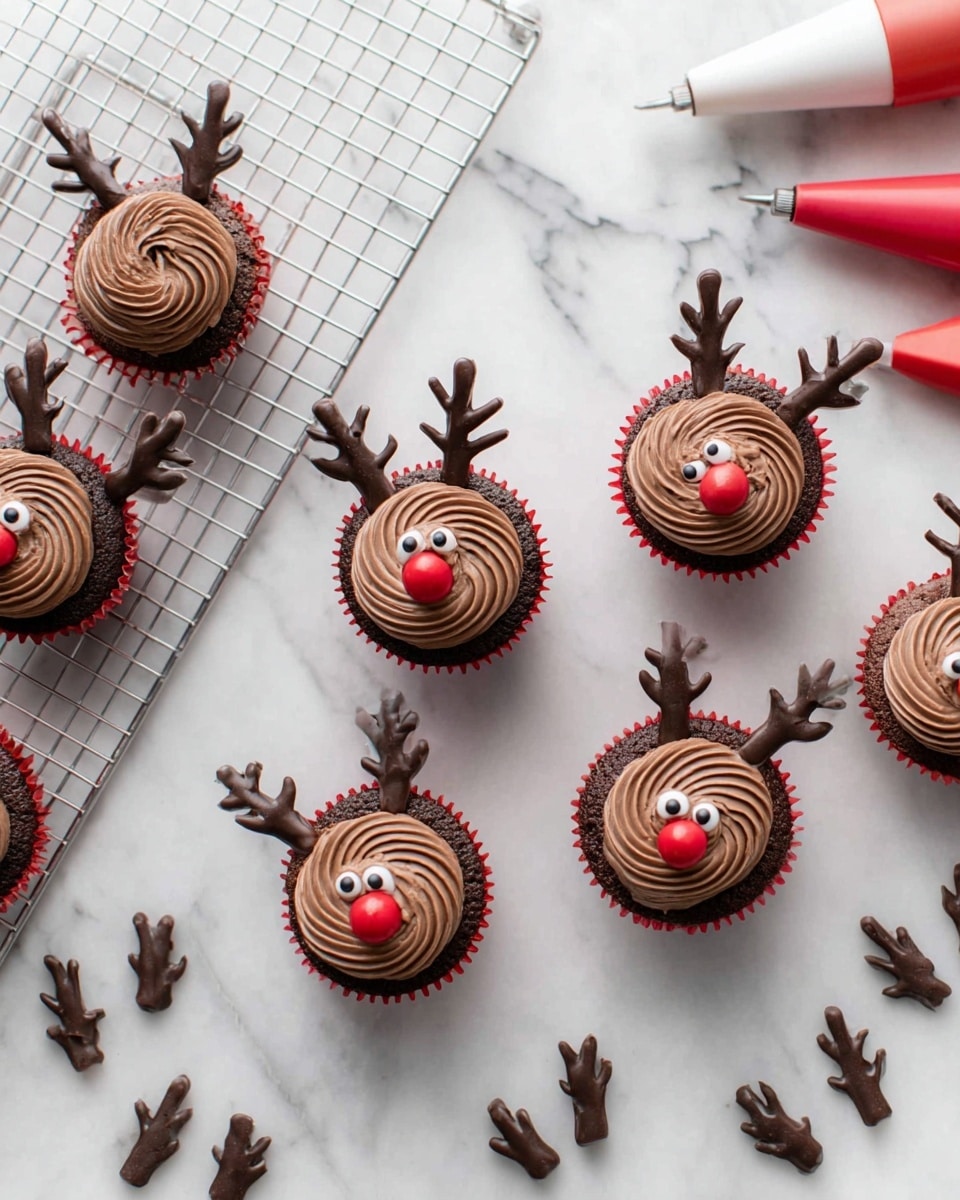
- Step 5: On parchment paper, pipe “Y”-shaped antlers using the melted chocolate. Make extra antlers as they can break. Allow them to dry completely.
- Step 6: Once cupcakes are baked, let them cool on a rack for 15-20 minutes.
- Step 7: Prepare three decorating bags fitted with tips: two with #10 tips filled with red and brown icing, and one with a #4 tip filled with black icing.
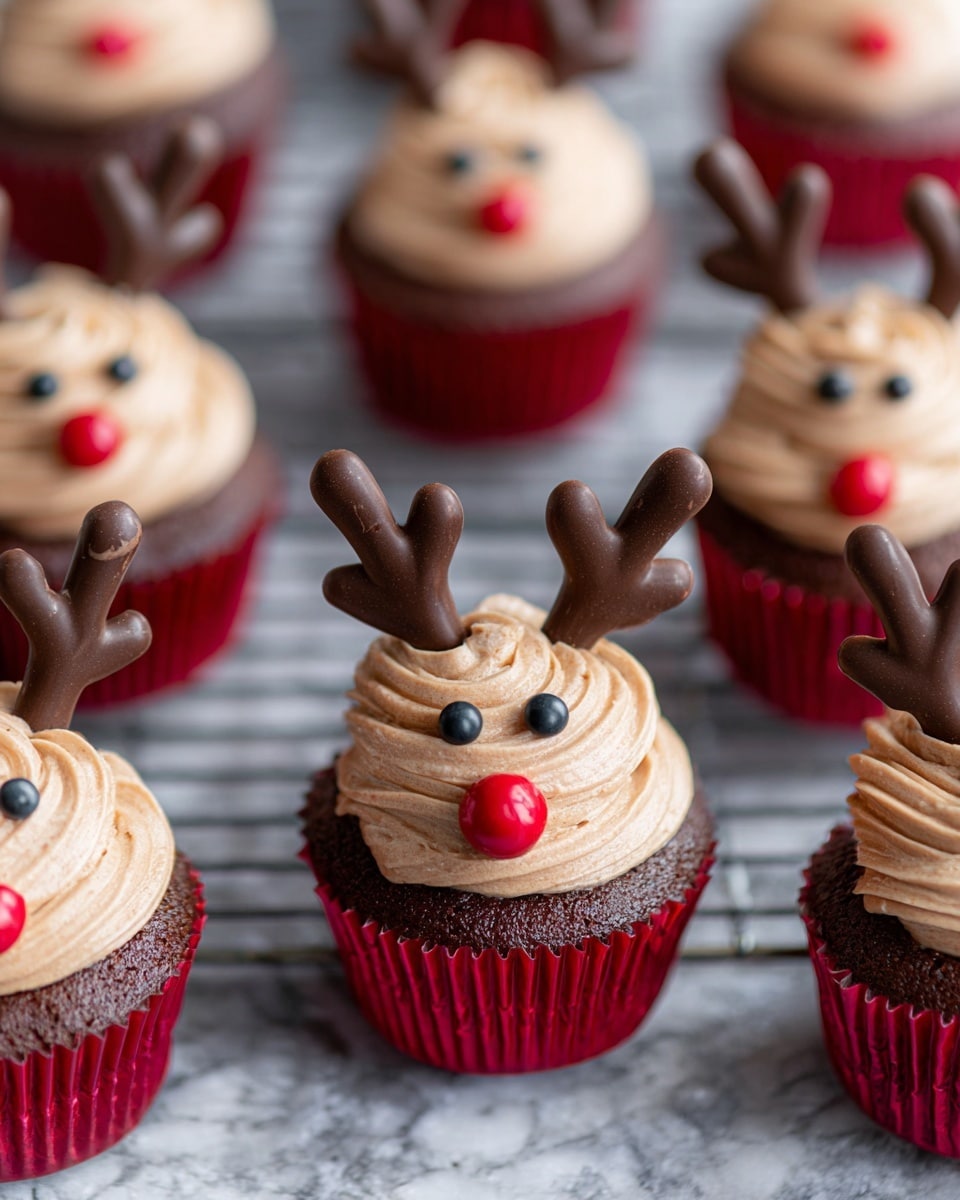
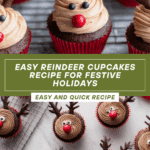
- Step 8: Using brown icing, swirl from the outer edge to the center of each cupcake in a clockwise motion to create the reindeer’s face.
- Step 9: Attach two chocolate antlers on each cupcake. Use black icing to pipe two small dots for eyes.
- Step 10: Finish with a red icing dot for the nose to complete your reindeer cupcakes.
Tips & Variations
- Use store-bought cupcakes to save time if you’re short on prep.
- Swap candy melts for melted white chocolate tinted with food coloring for a different antler look.
- For a fun twist, add a little edible glitter to the icing for extra sparkle.
- Try using mini marshmallows or chocolate chips for eyes if you don’t have decorator icing.
Storage
Store decorated cupcakes in an airtight container at room temperature for up to 2 days. For longer storage, keep them in the refrigerator for up to 4 days, but allow them to come to room temperature before serving to retain the best texture. Avoid covering tightly with plastic wrap to prevent icing damage.
How to Serve
Serve this delicious recipe with your favorite sides.
FAQs
Can I make the antlers ahead of time?
Yes, chocolate antlers can be made a day or two in advance and stored in an airtight container at room temperature until ready to use.
What if I don’t have decorating tips?
You can snip a small hole in the tip of disposable bags to pipe icing, though you may not achieve as precise a look as with decorating tips.
PrintEasy Reindeer Cupcakes Recipe

Easy Reindeer Cupcakes are a festive and fun holiday treat perfect for winter celebrations. These cupcakes are decorated with chocolate antlers, red noses, and adorable eyes, making them a delightful addition to any holiday party or family dessert table. Using your favorite cupcake recipe as the base, the decoration process is straightforward and involves simple piping techniques and candy melts to create charming reindeer faces.
- Prep Time: 20 minutes
- Cook Time: 17 minutes
- Total Time: 37 minutes
- Yield: 12 cupcakes
- Category: Dessert
- Method: Baking
- Cuisine: American
- Diet: Vegetarian
Ingredients
Cupcake Base
- Your favorite cupcake recipe batter
- Festive cupcake liners
Decorations
- Candy melts chocolate
- Wilton red icing
- Wilton brown icing
- Wilton black decorator icing
- Eyeball sprinkles
Tools & Accessories
- Cupcake baking pan
- Cooling rack
- Cookie scoop
- Disposable decorating bags
- Wilton #4 decorating tips (2 tips)
- Wilton #10 decorating tips (2 tips)
- Parchment paper
Instructions
- Prepare and bake cupcakes: Preheat your oven to 350°F (177°C). Place festive cupcake liners in your cupcake baking pan. Using a cookie scoop, evenly portion your cupcake batter into each liner. Bake according to your cupcake recipe, typically about 17 minutes at 350°F. Remove from oven when a toothpick inserted comes out clean.
- Melt candy melts and prepare decorating bag: While cupcakes bake, melt the candy melts in a microwave-safe bowl on 30% power in 30-second increments, stirring between each until fully melted. Snip the tip of a disposable decorating bag and fit with a Wilton #4 decorating tip. Fill the bag with the melted chocolate.
- Create chocolate antlers: Lay out a piece of parchment paper on a flat surface. Pipe “Y” shaped antlers carefully with the melted chocolate to form the reindeer antlers. Make extra antlers to account for any breakage. Allow them to dry completely until firm.
- Cool cupcakes: Once cupcakes are done, transfer them to a cooling rack and let cool for 15 to 20 minutes to reach room temperature before decorating.
- Prepare icing bags: Fit two disposable decorating bags with Wilton #10 tips; fill one with red icing and the other with brown icing. Fit another bag with a Wilton #4 tip and fill with black icing for detail work.
- Pipe brown icing on cupcakes: Hold the bag with brown icing vertically and pipe a smooth swirl starting from the outer edge of the cupcake moving clockwise inward to the center, covering the top evenly to form the reindeer’s face base.
- Attach chocolate antlers: Gently place two hardened chocolate antlers on top of each cupcake to represent the reindeer’s antlers.
- Decorate eyes and nose: Using the black icing with a #4 tip, pipe two small dots to create the eyes of the reindeer. Then, with the red icing, pipe a red nose on the front center of the cupcake. Optionally, add eyeball sprinkles for an extra cute effect.
Notes
- Make sure the cupcakes are completely cool before decorating to prevent icing from melting.
- If chocolate antlers are fragile, refrigerate them after piping to help harden quicker before applying.
- Use a cookie scoop to ensure cupcakes are uniformly sized for even baking.
- Extra chocolate antlers can be stored in an airtight container for a few days.
- You can substitute candy melts with white chocolate and add a few drops of food coloring for color variety.
Keywords: reindeer cupcakes, holiday cupcakes, festive desserts, Christmas treats, decorated cupcakes