Bread Recipe With Instant Yeast Recipe
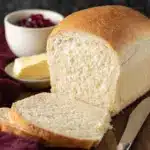
If you’ve ever wanted to bake soft, fluffy bread at home without fussing over complicated techniques, this Bread Recipe With Instant Yeast is your new best friend. With just a handful of pantry staples and some simple steps, you’ll be rewarded with gorgeous golden loaves that boast a perfect crust and tender crumb. Whether you’re a beginner or seasoned baker, this recipe brings the joy of fresh homemade bread right to your kitchen in no time.

Ingredients You’ll Need
Gathering these simple ingredients is the first exciting step in your bread-making adventure. Each one plays a crucial role: from feeding the yeast to creating the texture and flavor that makes this bread irresistibly delicious.
- Very warm water (2 cups): Just the right temperature to activate the yeast without killing it, ensuring your dough rises beautifully.
- Rapid rise yeast (1 packet or 2 1/4 teaspoons): This instant yeast speeds up the process, making your bread ready faster with a reliable rise.
- Granulated sugar (¼ cup): Feeds the yeast and adds a subtle sweetness that balances the loaf’s flavor.
- Vegetable oil (2 tablespoons): Keeps the bread moist and tender, lending it that pleasing softness.
- All-purpose flour (4¾-5¼ cups): The foundation of your bread, giving structure and body to the dough.
- Salt (1½ teaspoons): Enhances all the flavors and strengthens the dough’s gluten network for texture.
How to Make Bread Recipe With Instant Yeast
Step 1: Proof the Yeast
Start by combining the very warm water, yeast, and sugar in a large bowl. Stir gently and let the mixture sit for about five minutes. You’ll know it’s ready when it bubbles up with a creamy foam on top. This proofing step ensures your yeast is active and ready to give your bread its wonderful rise.
Step 2: Mix the Dough
Next, add the vegetable oil, half of the flour (about 2 1/4 cups), and salt to the yeast mixture. Begin mixing the dough using a dough hook attachment or your hands. Slowly add the remaining flour until the dough pulls away from the sides of the bowl, forming a smooth, elastic ball. Knead the dough for 4 to 5 minutes to develop that perfect gluten structure that results in a soft, chewy texture.
Step 3: Let the Dough Rise
Cover your bowl with a clean dish towel and place it in a warm spot. Let the dough rise for about 20 minutes, or until it almost doubles in size. This quick rise thanks to the instant yeast saves you time but still builds those beautiful air pockets inside the bread.
Step 4: Prepare and Shape the Loaves
Once risen, divide your dough into two equal portions. Generously spray two loaf pans with non-stick spray and gently place each half into the pans. This step sets the stage for those classic loaf shapes we all love and makes the bread easy to slice later.
Step 5: Bake Until Golden
Slide the pans into a preheated 350°F oven and bake for 25 to 30 minutes. You’ll know the bread is done when the crust turns a gorgeous golden brown. For an expert tip, tap the top of the loaf—if it sounds hollow, you’ve nailed the perfect bake.
Step 6: Cool Before Slicing
Allow the bread to cool in the pans for 5 to 10 minutes to set its shape. Then, turn the loaves out onto a cooling rack and let them cool completely. Resisting the urge to slice hot bread will help maintain the bread’s moist and tender crumb.
Step 7: Slice and Enjoy
Once cool, cut your bread into ½ inch slices. This versatile bread shines as sandwich bread, toast, or simply enjoyed fresh with butter. Store any leftovers in an airtight container for up to three days or freeze for longer preservation.
How to Serve Bread Recipe With Instant Yeast

Garnishes
Sprinkle a little coarse sea salt or brush the crust with melted butter for that extra shine and flavor boost. Fresh herbs like rosemary or thyme can be sprinkled just before baking for a fragrant twist. The simple additions create a memorable sensory experience with every bite.
Side Dishes
This bread pairs beautifully with soups, stews, and hearty salads. Its soft texture is perfect for mopping up rich sauces or creating satisfying sandwiches loaded with your favorite fillings. Think classic grilled cheese, creamy avocado toast, or even a decadent French toast breakfast.
Creative Ways to Present
Get creative by turning your freshly baked loaf into bruschetta with toppings like tomatoes, garlic, and basil. Or slice thickly for rustic bread pudding or homemade croutons. This Bread Recipe With Instant Yeast is a versatile base for so many delightful dishes, making it a staple in your kitchen rotation.
Make Ahead and Storage
Storing Leftovers
Keep your bread fresh by storing it in an airtight container or a large resealable plastic bag at room temperature. It will stay soft and delicious for up to three days, perfect for quick snack grabs or meal accompaniments.
Freezing
If you want to enjoy your bread for longer, freezing is a great option. Slice it before freezing so you can easily toast or thaw individual pieces. Wrap the bread tightly in plastic wrap, then place it in a freezer-safe bag to avoid freezer burn. It will keep well for up to three months.
Reheating
To bring frozen bread back to life, toast slices directly from the freezer or wrap a whole loaf in foil and warm it in the oven at 350°F for about 10-15 minutes. This revives the bread’s soft crumb and crispy crust as if it was freshly baked.
FAQs
Can I substitute active dry yeast for instant yeast in this recipe?
You can, but active dry yeast requires proofing in warm water longer and usually a bit more rising time. Instant yeast is designed for faster results, so you might need to adjust rising times accordingly.
Why is it important to use very warm water?
Warm water activates the yeast effectively, encouraging it to ferment and produce the gases that make the dough rise. Too hot, and it kills the yeast; too cold, and your rise will be slow or incomplete.
Can I add other ingredients like herbs or seeds to this bread?
Absolutely! Adding herbs, seeds, or even cheese can elevate your loaf. Just mix them into the dough during the flour addition step to ensure even distribution.
What is the purpose of oil in the dough?
Oil tenderizes the bread, adding moisture and richness that soften the crumb and help the bread stay fresh longer.
Can I make this bread without a stand mixer?
Definitely! You can mix and knead the dough by hand on a floured surface. It might take a bit more elbow grease but yields equally delicious results.
Final Thoughts
There’s something truly special about pulling warm, homemade bread from the oven, and this Bread Recipe With Instant Yeast makes that joy accessible to everyone. It’s simple, satisfying, and endlessly versatile—a recipe you’ll return to time and again. So grab your ingredients, get your hands doughy, and enjoy the incredible aroma and taste of fresh bread made right in your own kitchen.
PrintBread Recipe With Instant Yeast Recipe
This easy and classic bread recipe uses instant yeast for a quick and fluffy homemade loaf. Perfect for sandwiches or toast, it features a soft crumb and golden crust made with simple pantry ingredients, ideal for beginner bakers.
- Prep Time: 10 minutes
- Cook Time: 30 minutes
- Total Time: 1 hour
- Yield: 2 loaves (about 12 slices per loaf) 1x
- Category: Bread
- Method: Baking
- Cuisine: American
- Diet: Vegetarian
Ingredients
Yeast Mixture
- 2 cups very warm water (about 110°F/43°C)
- 1 packet rapid rise yeast (2 1/4 teaspoons)
- 1/4 cup granulated sugar
Dough
- 2 tablespoons vegetable oil
- 4 3/4 to 5 1/4 cups all-purpose flour
- 1 1/2 teaspoons salt
Instructions
- Proof the Yeast: In a large bowl, combine the very warm water, rapid rise yeast, and granulated sugar. Stir gently and let it stand for 5 minutes until the mixture becomes foamy and creamy, indicating the yeast is activated.
- Form the Dough: Add the vegetable oil, half of the flour (about 2 1/4 cups), and salt to the yeast mixture. Begin mixing with a dough hook or by hand. Gradually add the remaining flour until the dough pulls away from the bowl’s sides, then knead either with the hook or on a floured surface for 4-5 minutes until smooth and elastic.
- First Rise: Cover the dough with a clean dish towel and let it rise in a warm spot for about 20 minutes, or until it nearly doubles in size.
- Shape the Loaves: Divide the risen dough into two equal portions. Place each portion into a loaf pan that has been generously sprayed with non-stick spray, spreading it evenly.
- Bake the Bread: Preheat your oven to 350°F (175°C). Bake the loaves for 25-30 minutes until the tops turn golden brown. To test doneness, tap the top of the bread—if it sounds hollow, the bread is fully baked.
- Cool the Loaves: Remove the pans from the oven and let the loaves cool inside the pans for 5-10 minutes. Then, transfer the loaves to a cooling rack to cool completely, preventing sogginess.
- Serve and Store: Slice the bread into 1/2-inch thick pieces once cooled. Use immediately for sandwiches or toast. Store leftover bread in an airtight container for up to 3 days, or freeze for up to 3 months to maintain freshness.
Notes
- Use water that is warm to the touch but not hot, ideally around 110°F, to properly activate the yeast without killing it.
- Adjust the flour amount slightly depending on humidity and flour type to achieve a manageable dough that is not too sticky or too dry.
- Allowing the dough to rise in a warm but draft-free environment helps yeast develop better.
- For a crustier loaf, you can bake it on a baking stone or place a pan of water in the oven to create steam.
- Slice bread only after it has completely cooled to avoid squashing the loaf.
- You can add herbs or seeds to the dough for extra flavor or texture.
Nutrition
- Serving Size: 1 slice (1/2 inch thick)
- Calories: 110
- Sugar: 2.5g
- Sodium: 180mg
- Fat: 1.5g
- Saturated Fat: 0.2g
- Unsaturated Fat: 1.3g
- Trans Fat: 0g
- Carbohydrates: 22g
- Fiber: 1g
- Protein: 3g
- Cholesterol: 0mg
Keywords: homemade bread, instant yeast bread, easy bread recipe, sandwich bread, quick yeast bread


