Teriyaki Pineapple Chicken and Rice Stuffed Peppers Recipe
Introduction
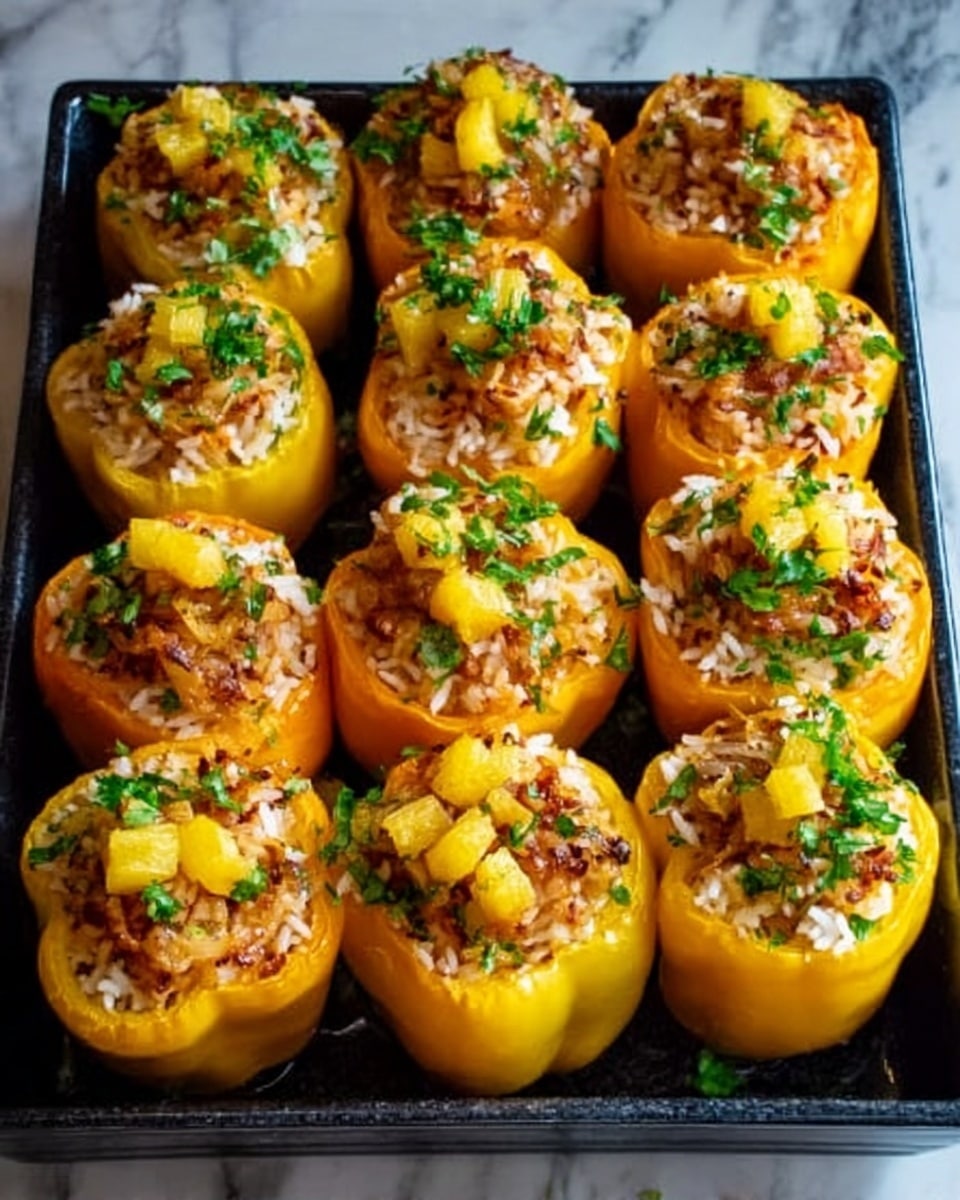
Teriyaki Pineapple Chicken and Rice Stuffed Peppers are a delightful mix of sweet and savory flavors packed into colorful bell peppers. This dish combines tender teriyaki chicken, juicy pineapple, and hearty rice for a balanced, satisfying meal perfect for any weeknight dinner.

Ingredients
- 2 large boneless, skinless chicken breasts (shredded)
- 1 cup cooked rice (white or brown)
- 1/2 cup diced pineapple (fresh or canned, drained)
- 1/4 cup teriyaki sauce
- 1 tablespoon olive oil (for sautéing)
- 2 cloves garlic, minced
- 1 teaspoon ground ginger
- 1/2 teaspoon red pepper flakes (optional)
- Salt and pepper to taste
- 4 large bell peppers (any color), tops cut off and seeds removed
- 1 tablespoon olive oil (for drizzling over the peppers)
- 1/4 cup shredded mozzarella or cheddar cheese (optional, for topping)
Instructions
- Step 1: Preheat your oven to 375°F (190°C). Cut off the tops of the bell peppers, remove the seeds and membranes. Optionally, blanch the peppers in boiling water for 5–6 minutes to slightly soften them. Place the prepared peppers in a baking dish.
- Step 2: Heat 1 tablespoon olive oil in a large skillet over medium heat. Sauté the minced garlic for 1–2 minutes until fragrant. Add the shredded chicken, teriyaki sauce, pineapple, ground ginger, and red pepper flakes if using. Cook for 5–6 minutes, stirring occasionally.
- Step 3: Stir the cooked rice into the chicken mixture until well combined. Season with salt and pepper to taste.
- Step 4: Spoon the chicken and rice mixture into each bell pepper, pressing gently to pack the filling tightly. Drizzle the stuffed peppers with olive oil.
- Step 5: Cover the baking dish with foil and bake for 25–30 minutes until the peppers are tender. For crispier tops, remove the foil during the last 5 minutes of baking.
- Step 6: If using cheese, sprinkle it over the peppers during the last 5 minutes of baking and bake until melted and bubbly.
- Step 7: Remove from the oven and let cool slightly before serving. Garnish with extra pineapple or chopped green onions if desired.
Tips & Variations
- Use leftover cooked chicken to save time without sacrificing flavor.
- Substitute rice with quinoa or cauliflower rice for a healthier or low-carb option.
- Add a spicy kick by mixing in sriracha or your favorite hot sauce with the filling.
- Make a vegetarian version by replacing chicken with black beans, tofu, or tempeh.
- Prepare stuffed peppers ahead of time and refrigerate up to 2 days before baking.
Storage
Store leftover stuffed peppers in an airtight container in the refrigerator for 3–4 days. To reheat, place them in a baking dish covered with foil and bake at 350°F (175°C) for 10–15 minutes until warmed through. Alternatively, reheat individual portions in the microwave for 1–2 minutes.
How to Serve
Serve this delicious recipe with your favorite sides.
FAQs
Can I use other vegetables for stuffing?
Yes! Feel free to add sautéed mushrooms, spinach, or carrots to the filling for extra flavor and nutrition.
Can I make these stuffed peppers vegetarian?
Absolutely. Substitute the chicken with black beans, tofu, or tempeh for a delicious vegetarian alternative.
PrintTeriyaki Pineapple Chicken and Rice Stuffed Peppers Recipe

Teriyaki Pineapple Chicken and Rice Stuffed Peppers are a sweet and savory dinner featuring tender shredded chicken, juicy pineapple, and hearty rice all packed into colorful bell peppers. This healthy, satisfying, and easy-to-prepare dish combines bold flavors with simple ingredients, making it perfect for an easy weeknight dinner or meal prep. The umami-rich teriyaki sauce balances perfectly with the sweetness of pineapple, while the peppers provide a nutritious vegetable base, resulting in a balanced and delicious main course.
- Prep Time: 20 minutes
- Cook Time: 30 minutes
- Total Time: 50 minutes
- Yield: 4 servings 1x
- Category: Main Course
- Method: Baking
- Cuisine: Asian-Inspired
Ingredients
For the Chicken and Rice Filling:
- 2 large boneless, skinless chicken breasts (shredded)
- 1 cup cooked rice (white or brown)
- 1/2 cup diced pineapple (fresh or canned, drained)
- 1/4 cup teriyaki sauce (store-bought or homemade)
- 1 tablespoon olive oil (for sautéing)
- 2 cloves garlic, minced
- 1 teaspoon ground ginger
- 1/2 teaspoon red pepper flakes (optional, for heat)
- Salt and pepper to taste
For the Stuffed Peppers:
- 4 large bell peppers (any color), tops cut off and seeds removed
- 1 tablespoon olive oil (for drizzling over the peppers)
- 1/4 cup shredded mozzarella or cheddar cheese (optional, for topping)
Instructions
- Prepare the Peppers: Preheat your oven to 375°F (190°C). Cut off the tops of the bell peppers and remove the seeds and membranes inside. Optionally, blanch the peppers in boiling water for 5-6 minutes to soften them slightly. Place the prepared peppers upright in a baking dish.
- Cook the Chicken and Rice: Heat olive oil in a large skillet over medium heat. Add minced garlic and sauté for 1-2 minutes until fragrant. Add shredded chicken, then stir in teriyaki sauce, diced pineapple, ground ginger, and red pepper flakes if using. Cook for 5-6 minutes to allow flavors to meld and the chicken to warm through. Finally, add the cooked rice and combine thoroughly. Season with salt and pepper to taste.
- Stuff the Peppers: Spoon the chicken and rice mixture evenly into each bell pepper, pressing gently to pack the filling securely. Drizzle olive oil over the tops of the stuffed peppers to help with baking.
- Bake the Peppers: Cover the baking dish with aluminum foil and bake in the preheated oven for 25-30 minutes until the peppers are tender. For a crispy top, remove the foil during the last 5 minutes of baking.
- Add the Cheese (Optional): If desired, sprinkle shredded mozzarella or cheddar cheese on top of the peppers during the final 5 minutes of baking and continue until the cheese is melted and bubbly.
- Serve and Enjoy: Remove the stuffed peppers from the oven and let them cool slightly. Serve warm, garnished with extra pineapple chunks or chopped green onions for added freshness.
Notes
- Use leftover shredded chicken to save preparation time.
- Substitute cooked rice with quinoa or cauliflower rice for a healthier or low-carb option.
- Prepare stuffed peppers ahead of time and refrigerate for up to 2 days before baking.
- Make vegetarian by replacing chicken with black beans, tofu, or tempeh.
- Ensure canned pineapple is well-drained to avoid excess moisture in the filling.
- Avoid overcooking peppers to keep them tender but not mushy.
Keywords: teriyaki chicken, stuffed peppers, pineapple chicken, rice stuffed peppers, sweet and savory chicken, healthy stuffed peppers, easy dinner recipe, meal prep, baked stuffed peppers


