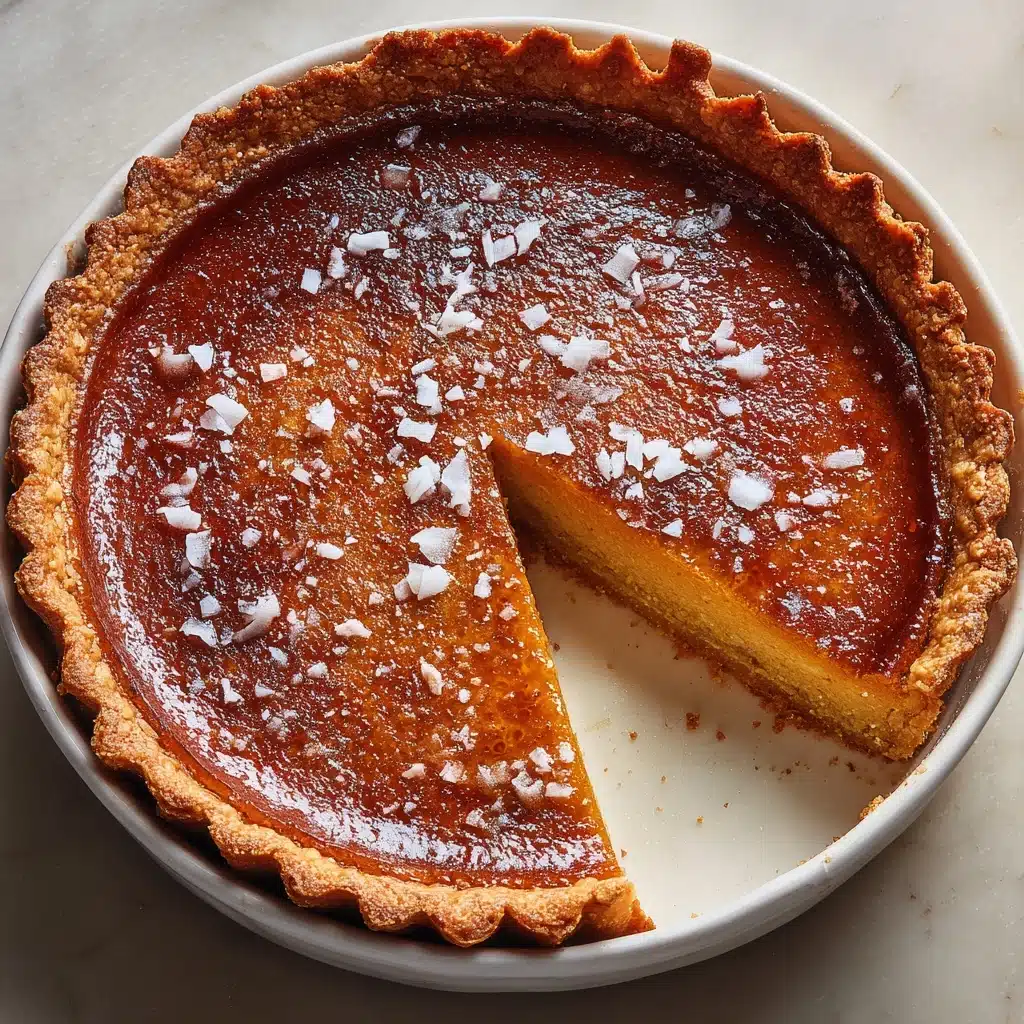
Salted Honey Pie Recipe
Salted Honey Pie is the definition of sweet simplicity taken to new heights. Imagine a pie that strikes that beautiful balance between floral honey notes and the boldness of flakey sea salt—each bite is satiny-smooth, with the perfect contrast of creamy custard and melt-in-your-mouth crust. Whether you’re indulging after a long week or saving it for a special gathering, this Salted Honey Pie is bound to turn any moment into an extraordinary occasion. It’s comfort food with a gourmet twist, and trust me: once you try it, you’ll find yourself making it again and again.
Ingredients You’ll Need
Every ingredient in Salted Honey Pie serves a delicious purpose, combining for a custardy dessert that’s as easy to make as it is dreamy to eat. Here’s the lineup of essentials—each one carefully chosen for its flavor, texture, or the magic it brings to the table.
- Pie crust, refrigerated or homemade: The foundation! A buttery, flaky crust is the delicious stage for the silky filling—don’t skip chilling it in the fridge.
- 4 large egg yolks, lightly beaten: These are the secret to the pie’s rich, custard-like texture and gorgeous golden hue.
- 2 1/2 cups (600ml) heavy whipping cream: This is what gives the filling its creamy, luxurious mouthfeel.
- 2/3 cup (150g) packed light brown sugar: Brings a deep, caramelized sweetness that’s richer than regular sugar.
- 1/3 cup (45g) cornstarch, sifted: For flawless thickening—sift it in to avoid lumps and ensure a silky texture.
- 1/2 tsp salt: Adds a touch of balance to keep things from getting too sweet.
- 1/2 cup (120ml) honey: The showstopper! Use a good quality honey for the purest, brightest flavor.
- 2 tsp vanilla extract: Enhances the honey with warm, aromatic notes.
- Flakey sea salt: Sprinkle generously—this transforms the pie and highlights the honey flavor beautifully.
How to Make Salted Honey Pie
Step 1: Prepare the Pie Crust
Start by rolling out your pie crust (store-bought or homemade—either works beautifully) and nestle it into a deep dish 8-inch or a 9-inch pie pan. The key here is chilling: after placing the crust, put it straight into the fridge. Chilling keeps that buttery texture and prevents shrinking. Preheat your oven to 375°F so it’s hot and ready when you need it. No pre-baking required!
Step 2: Ready the Egg Yolks
Crack four large eggs and separate the yolks. Give them a gentle whisk in a large bowl and set aside. This keeps things moving along when it’s time to temper and ensures a silkier filling.
Step 3: Create the Creamy Base
In a medium saucepan, combine the heavy whipping cream, brown sugar, sifted cornstarch, and salt. Cook over medium heat, stirring, until the mixture comes to a rolling boil. Stirring is crucial: it prevents burning and ensures the cornstarch and sugar blend in seamlessly, creating a thick and dreamy consistency.
Step 4: Boil and Thicken
Once you hit that full, rolling boil and the mixture starts to thicken, quickly remove the saucepan from the heat. This is when the custard magic starts—get ready for the most luscious filling!
Step 5: Temper the Eggs
Now it’s time for tempering, which simply means gradually combining hot and cold to prevent scrambling. Slowly drizzle a bit of the hot cream mixture into the egg yolks while whisking constantly. Do this a couple of times, then add the rest of the cream mixture. This keeps the color vibrant and the texture ultra-smooth.
Step 6: Mix in the Honey and Vanilla
While the custard is still warm, stir in the honey and vanilla extract. The heat will melt everything together, and the aroma is absolutely heavenly. These are the flavors that make Salted Honey Pie unforgettable.
Step 7: Fill and Bake
Pour the finished custard into your chilled pie crust. Slide the pie into the preheated oven and bake for 40–45 minutes. Keep an eye out: the filling will puff, bubble, and start to brown on top—take it out when it’s gorgeous but still jiggly in the center.
Step 8: Cool and Set
Remove the pie from the oven and set it on the counter to cool. It’ll still look quite soft, but don’t worry! As it comes to room temperature and then chills in the fridge, it will set up into that dreamy custard texture. Give it time—patience pays off in every slice.
Step 9: Chill and Finish
Once the Salted Honey Pie is cooled to room temp, pop it in the fridge until it’s fully chilled and set. Just before serving, sprinkle the top generously with flakey sea salt. This last touch brings out the honey’s floral notes and adds that irresistible salty crunch.
How to Serve Salted Honey Pie

Garnishes
For a classic finish, flakey sea salt is non-negotiable—it amplifies every other flavor in the pie. For extra flair, add a dusting of edible dried flowers or a drizzle of extra honey right before serving. A dollop of fresh whipped cream will make each slice even more heavenly.
Side Dishes
While Salted Honey Pie shines bright on its own, it’s also delightful alongside fresh berries or a light fruit salad, which add a subtle tartness that balances out the rich filling. If you’re looking to indulge, pair it with vanilla ice cream for a cool, creamy contrast.
Creative Ways to Present
Turn your Salted Honey Pie into a showstopper by cutting it into mini tartlets for a party-friendly dessert bar. Serve with a honeycomb wedge on the side or use edible flowers for a rustic, garden-inspired look. You can even stack thin slices with alternating layers of fresh fruit for an unexpected, elegant twist.
Make Ahead and Storage
Storing Leftovers
To keep your Salted Honey Pie tasting its best, store any leftovers tightly wrapped or in an airtight container in the fridge. It will stay fresh and dreamy for up to 3 days—if it even lasts that long!
Freezing
Yes, you can freeze Salted Honey Pie! Once fully chilled, wrap individual slices or the whole pie tightly in plastic wrap and a layer of foil. It’ll keep for up to 2 months. Let it thaw overnight in the refrigerator for the best texture before serving.
Reheating
If you prefer your pie slightly warm, heat slices in the microwave in short bursts (about 10–15 seconds) until just warmed through. Avoid overheating, which can make the custard weep. Add a pinch more flakey sea salt after reheating to boost those signature flavors.
FAQs
Can I use a store-bought crust?
Absolutely! A high-quality refrigerated or frozen pie crust works perfectly and makes Salted Honey Pie downright easy to whip up, especially when you’re short on time.
What type of honey works best?
Go for a good quality, mild honey so the flavor comes through without overpowering. Clover, wildflower, or orange blossom honey all work beautifully in Salted Honey Pie.
Can I make this pie gluten-free?
Yes—just substitute a gluten-free pie crust for the base. The filling is naturally gluten-free, thanks to cornstarch, so you’re good to go!
Why does my filling look a little wobbly?
A bit of jiggle is perfectly normal! Salted Honey Pie sets up as it cools, so if it’s still a bit wobbly right out of the oven, give it time to set in the fridge before slicing.
Can I make Salted Honey Pie a day in advance?
Absolutely, in fact, it’s even better the next day. Make the pie, let it cool, and then chill overnight for the dreamiest, most sliceable texture.
Final Thoughts
If you’re looking for an irresistibly creamy dessert with a true wow-factor, Salted Honey Pie is the one to try. Cozy, decadent, and just a little bit different, it’s a sweet hug in pie form—so gather your ingredients and treat yourself soon. You’ll be glad you did!
PrintSalted Honey Pie Recipe

Indulge in the sweet and salty goodness of this Salted Honey Pie. A luscious custard filling with a hint of honey, baked in a flaky crust and topped with a sprinkle of sea salt for the perfect balance of flavors.
- Prep Time: 30 minutes
- Cook Time: 45 minutes
- Total Time: 1 hour 15 minutes
- Yield: 1 pie (8-10 servings) 1x
- Category: Dessert
- Method: Baking
- Cuisine: American
- Diet: Vegetarian
Ingredients
Pie Crust:
- Refrigerated or homemade pie crust
Filling:
- 4 large egg yolks, lightly beaten
- 2 1/2 cups (600ml) heavy whipping cream
- 2/3 cup (150g) packed light brown sugar
- 1/3 cup (45g) cornstarch, sifted
- 1/2 tsp salt
- 1/2 cup (120ml) honey
- 2 tsp vanilla extract
Finishing:
- Flakey sea salt
Instructions
- Prepare the Pie Crust: Line a deep dish 8-inch or 9-inch pie pan with the crust and chill in the fridge.
- Prepare Filling: Beat egg yolks in a large bowl. In a saucepan, heat cream, brown sugar, cornstarch, and salt until thickened.
- Temper Eggs: Gradually whisk cream mixture into egg yolks. Stir in honey and vanilla.
- Bake: Pour filling into crust and bake at 375°F for 40-45 minutes.
- Cool and Chill: Let the pie cool to room temperature, then refrigerate until firm.
- Finish: Sprinkle sea salt on top before serving.
Notes
- For a richer flavor, use a homemade pie crust.
- Adjust the salt to your preference for a more or less salty pie.
Nutrition
- Serving Size: 1 slice
- Calories: 380
- Sugar: 22g
- Sodium: 240mg
- Fat: 25g
- Saturated Fat: 15g
- Unsaturated Fat: 8g
- Trans Fat: 0g
- Carbohydrates: 35g
- Fiber: 1g
- Protein: 4g
- Cholesterol: 180mg
Keywords: Salted Honey Pie, Dessert, Custard Pie, Homemade Pie


