Crack Breakfast Sliders (Bacon Egg & Cheese) Recipe
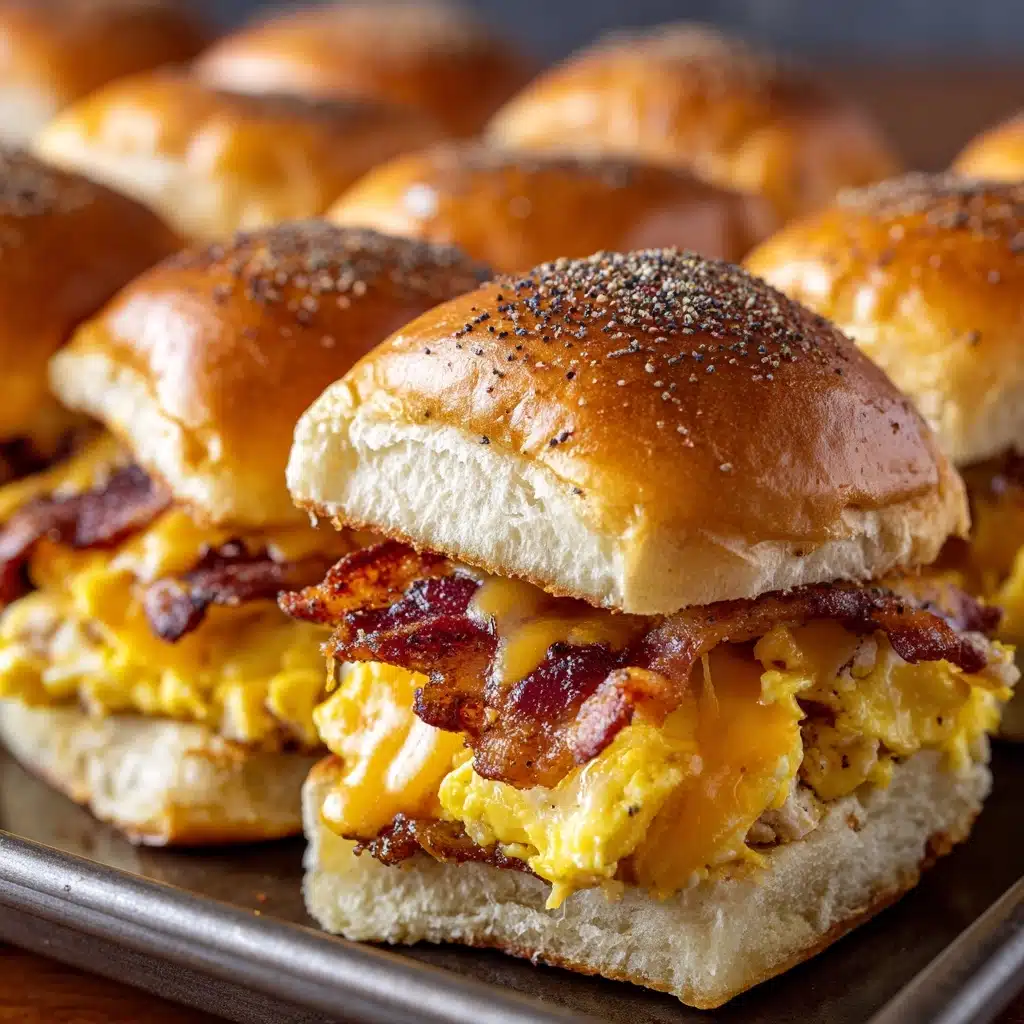
If you’re searching for the ultimate satisfying way to start your morning (or honestly, any time of day), you have to try Crack Breakfast Sliders (Bacon Egg & Cheese)! These irresistible little sandwiches are pillowy Hawaiian rolls bursting with fluffy eggs, crispy bacon, and gooey cheddar cheese—all topped with a buttery ranch glaze that just pushes them over the top. They’re outrageously craveable and come together so much more easily than you’d expect. Whether you’re hosting brunch or just feeding a hungry crowd, this dish will absolutely become a household favorite.
Ingredients You’ll Need
Every ingredient here is simple, but together they create those comforting flavors and textures you crave in breakfast. Don’t skip anything—each one brings something essential to the show, from creamy eggs to that irresistible sweet-and-savory roll.
- Large eggs: Eight eggs make a fluffy, protein-packed base that holds up beautifully in each slider bite.
- Heavy cream: This little splash makes your scrambled eggs extra creamy and luxurious.
- Salt and pepper: Always season your eggs well; it’s the difference between bland and fabulous.
- Butter: Used once for scrambling the eggs and again, melted, to brush over the top—it adds flavor and golden color.
- Bacon: A whole pound delivers smoky, salty crunch in every bite—don’t skimp!
- Shredded cheddar cheese: Divided for perfect melting between layers, giving stringy, melty goodness.
- Melted butter: This will help the ranch seasoning stick and create that golden top.
- Ranch dressing mix: A fun twist that seasons the bun tops, making them savory and downright addictive.
- Hawaiian rolls: Their signature sweetness and soft texture are key for perfect Crack Breakfast Sliders (Bacon Egg & Cheese).
How to Make Crack Breakfast Sliders (Bacon Egg & Cheese)
Step 1: Prep Your Oven and Pan
Start by preheating your oven to 350°F, so it’s hot and ready when you need it. While that warms up, grab a 9×13-inch baking dish and give it a quick spray with nonstick cooking spray. This little step guarantees those oozy edges won’t stick and makes cleanup a breeze later on.
Step 2: Whisk Together the Eggs
In a large bowl, crack in the eggs and pour in the heavy cream. Add a generous sprinkle of salt and pepper, then whisk until it’s fully combined and slightly frothy. The cream makes for the creamiest, most luscious scrambled eggs—a must in Crack Breakfast Sliders (Bacon Egg & Cheese).
Step 3: Scramble the Eggs
Melt a tablespoon of butter in a large skillet over medium heat, letting it get just bubbly. Pour in your egg mixture and gently scramble, pushing the eggs from the edges toward the center. Cook just until they’re set but still soft. This texture will keep your sliders moist and dreamy after baking.
Step 4: Crisp Up the Bacon
Now, in the same skillet (no need for extra pans!), cook all the bacon until it’s beautifully crispy. The secret is to get that perfect crunch, so don’t rush—medium-high heat is your friend here. Once cooked, let the bacon drain on paper towels and then cut each strip into four pieces. This way, every slider is guaranteed a little bit of bacon in every bite.
Step 5: Layer the Sliders
Take your Hawaiian rolls and, keeping them all together, slice the whole loaf horizontally. Lay the bottom half in your greased baking dish. Sprinkle on half of your cheddar cheese, then spread the scrambled eggs all over. Now, pile on the bacon pieces. Finish with the remaining cheese, and gently place the roll tops on to complete the assembly.
Step 6: Ranch Butter Magic
Mix your melted butter with the ranch dressing mix in a small bowl. Using a pastry brush, generously coat the tops of the buns with this flavorful butter. It inspires that “crack” factor in Crack Breakfast Sliders (Bacon Egg & Cheese) and bakes to a savory golden finish.
Step 7: Bake to Perfection
Slide the dish into your preheated oven and bake for 15 to 20 minutes. You’re looking for bubbling cheese, toasty-topped rolls, and everything heated through. Once finished, let them cool for just a few minutes, then slice and serve warm—the hardest part is not diving in immediately!
How to Serve Crack Breakfast Sliders (Bacon Egg & Cheese)

Garnishes
A simple sprinkle of fresh chives or parsley offers a pop of color and a whisper of freshness. For a little extra kick, try scattering on finely diced jalapenos or a dusting of smoked paprika. Each garnish ups the wow factor and brings something special to your Crack Breakfast Sliders (Bacon Egg & Cheese).
Side Dishes
Want to make your breakfast even more memorable? Pair your sliders with crispy hashbrowns, a simple fruit salad, or even a side of roasted breakfast potatoes. The richness of the sliders is the perfect match for lighter, brighter sides, balancing the meal beautifully.
Creative Ways to Present
If you’re serving a crowd, arrange the sliders on a large platter lined with parchment, and let guests pull them apart. For brunch buffets, cut each slider in half so people can try a sampler plate with other breakfast favorites. Feeling extra fancy? Serve with mini flag picks or wooden skewers for easy party grabbing!
Make Ahead and Storage
Storing Leftovers
Wrap any leftover Crack Breakfast Sliders (Bacon Egg & Cheese) tightly in foil or place them in an airtight container. Stored in the refrigerator, they’ll stay fresh for up to three days. They reheat beautifully and make a quick on-the-go breakfast or late-night snack.
Freezing
If you want to make these ahead, let them cool completely, then wrap individual sliders (or the whole slab, if you’re prepping for a crowd) tightly in plastic wrap and foil. They’ll keep in the freezer for up to a month. Perfect for meal prep or surprise sleepovers!
Reheating
To reheat, unwrap your slider and pop it in the microwave for about 30 seconds, or in a 350°F oven for 10-12 minutes. If reheating from frozen, add a few extra minutes in the oven. The cheese will get melty again, and the buns will stay nice and soft.
FAQs
Can I use a different cheese in Crack Breakfast Sliders (Bacon Egg & Cheese)?
Absolutely! While cheddar melts wonderfully, you can swap in Colby jack, pepper jack for some spice, or even Swiss if you love a nutty flavor. Change it up based on what you have—these sliders are super flexible!
Can I make Crack Breakfast Sliders (Bacon Egg & Cheese) vegetarian?
You sure can! Omit the bacon entirely or swap in meatless bacon, veggie sausage, or even sautéed mushrooms for a hearty, umami punch. All the other steps stay the same.
Do I have to use ranch dressing mix on top?
Nope! If ranch isn’t your thing, try an “everything bagel” seasoning or just a sprinkle of garlic powder and herbs mixed into the melted butter. It’s the finishing touch that offers big flavor, but you have options.
Can I assemble the sliders the night before?
Yes, you can assemble everything up to the point of baking, cover tightly, and refrigerate overnight. In the morning, just brush with ranch butter and bake as usual. Perfect for seamless brunch parties or early breakfasts!
What’s the best way to cut Hawaiian rolls for Crack Breakfast Sliders (Bacon Egg & Cheese)?
Use a large serrated bread knife and slice straight across the middle, keeping the rolls intact as a single slab. This method creates equal-sized sandwiches and makes for seamless layering (and serving) later on!
Final Thoughts
If you haven’t tried Crack Breakfast Sliders (Bacon Egg & Cheese) yet, you’re about to discover your new breakfast obsession. There’s something special about the way the sweet rolls, creamy eggs, crispy bacon, and melty cheese come together under that golden ranch-topped lid. Gather your loved ones and treat everyone to a tray—they’ll be raving, promise!
PrintCrack Breakfast Sliders (Bacon Egg & Cheese) Recipe
These Crack Breakfast Sliders are the ultimate savory breakfast treat, featuring crispy bacon, fluffy scrambled eggs, and gooey melted cheddar cheese sandwiched between sweet Hawaiian rolls. Perfect for a delicious and satisfying morning meal!
- Prep Time: 15 minutes
- Cook Time: 20 minutes
- Total Time: 35 minutes
- Yield: 12 sliders 1x
- Category: Breakfast
- Method: Baking
- Cuisine: American
- Diet: Vegetarian
Ingredients
Eggs:
8 large eggs
- 1/4 cup heavy cream
- Salt and pepper to taste
- 1 tablespoon butter
Bacon:
1 lb bacon
- 2 cups shredded cheddar cheese, divided
- 2 tablespoons melted butter
- 1 tablespoon ranch dressing mix
- 1 (12 oz) package Hawaiian rolls
Instructions
- Preheat the oven: Preheat the oven to 350°F. Spray a 9×13-inch baking dish with nonstick cooking spray.
- Prepare the eggs: In a large bowl, whisk together eggs, heavy cream, salt, and pepper. Melt 1 tablespoon butter in a large skillet over medium heat. Add the egg mixture and scramble. Set aside.
- Cook the bacon: Cook bacon slices in the skillet over medium-high heat until crispy. Cut the bacon slices into 4 pieces each. Set aside.
- Assemble the sliders: Without separating the rolls, cut the entire loaf horizontally and place the bottoms in the prepared 9×13-inch baking dish. Sprinkle 1 cup of cheese on the bottom of the rolls. Layer the scrambled eggs and bacon slices, and top with the remaining cheese. Place the top buns over the cheese.
- Add the ranch butter: In a small bowl, combine melted butter and ranch dressing mix. Brush the ranch butter over the tops of the rolls.
- Bake: Bake for 15 to 20 minutes until the cheese has melted and the rolls are warm.
Nutrition
- Serving Size: 1 slider
- Calories: 320
- Sugar: 2g
- Sodium: 580mg
- Fat: 23g
- Saturated Fat: 11g
- Unsaturated Fat: 9g
- Trans Fat: 0g
- Carbohydrates: 15g
- Fiber: 1g
- Protein: 15g
- Cholesterol: 225mg
Keywords: Breakfast Sliders, Bacon Egg Cheese Sliders, Hawaiian Roll Sliders


