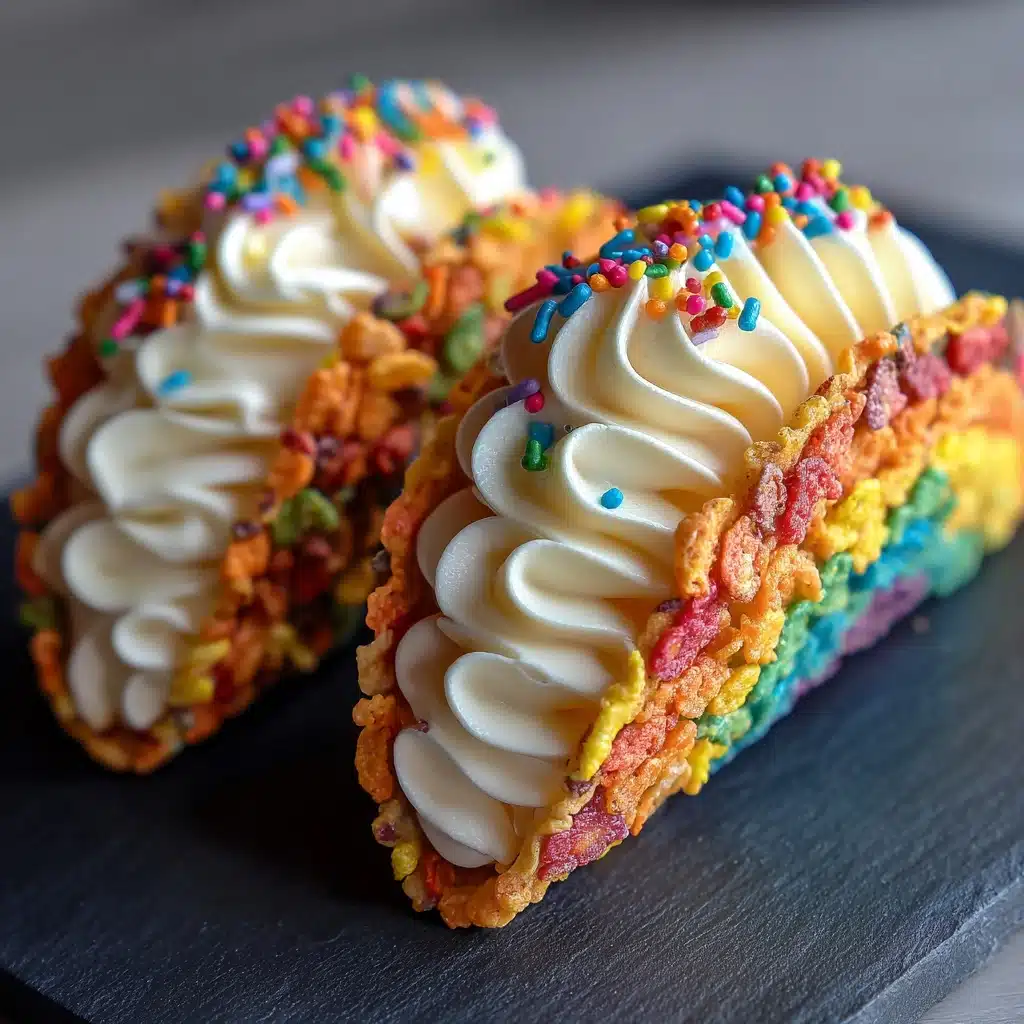
Fruity Pebbles Cheesecake Tacos Recipe
If you think you’ve tasted all the fun desserts out there, wait until you try Fruity Pebbles Cheesecake Tacos! Imagine a crispy, rainbow-hued cereal shell brimming with smooth, tangy cheesecake filling—all finished with a dusting of extra cereal crunch. Every bite is a nostalgic trip to your favorite Saturday morning cartoons, elevated to the world of grown-up dessert dreams. These tacos are playful, vibrant, and a guaranteed crowd-pleaser, perfect for parties, birthdays, or simply turning an ordinary day utterly extraordinary.

Ingredients You’ll Need
It’s amazing how just a handful of pantry staples can create something this whimsical and eye-catching! Each ingredient plays a starring role—some bring the color, some add creaminess, and together they balance sweet nostalgia with velvety indulgence.
- Fruity cereal (3 cups): This is the heart of your crust—bringing that unmistakable burst of color and crunch.
- Unsalted butter (1/2 cup, melted): Holds your cereal shells together and adds a rich, toasty flavor.
- Cream cheese (8 oz, softened): The luscious base for your cheesecake filling—make sure it’s perfectly soft for extra creamy results.
- Powdered sugar (1/2 cup, sifted): Delivers just the right touch of sweetness for the filling without any grittiness.
- Pure vanilla extract (1 tsp): Rounds out the flavor with a warm, familiar aroma.
- Whipped cream (1 cup): Folded into the filling for a cloudlike, airy texture that contrasts with the crunchy shell.
- Additional fruity cereal: The finishing flourish for extra crunch and color—a little on top goes a long way!
How to Make Fruity Pebbles Cheesecake Tacos
Step 1: Prepare the Crunchy Shell
Start your Fruity Pebbles Cheesecake Tacos by grabbing a large mixing bowl and pouring in your fruity cereal. Drizzle the melted butter over the cereal and, using a spatula (or your clean hands!), mix thoroughly to coat every last piece. The butter acts like edible glue, helping the cereal stick together to form that unmistakable taco crunch.
Step 2: Shape Your Shells
Now comes the fun, slightly crafty part! Either use small taco molds if you have them on hand, or press your cereal mixture into the wells of a muffin tin, making a taco shape by curving each disc along the side. Press firmly! The more compact your shells, the sturdier and more satisfying the crunch will be when you bite in. Slide the molds into the fridge and give them at least 30 minutes to chill and set.
Step 3: Whisk Up the Cheesecake Filling
While your shells are firming up, let’s whip up that dreamy filling. With a hand mixer, beat softened cream cheese until it’s supersmooth and a little fluffy. Gradually add the sifted powdered sugar and vanilla, mixing just until blended. You’re looking for a rich and creamy base with that distinctive cheesecake tang.
Step 4: Add Airiness
This is the secret step for the best Fruity Pebbles Cheesecake Tacos—the cheesecake filling gets a gentle lift. With a spatula, carefully fold in the whipped cream until the mixture is light and mousse-like. Don’t overmix; you want to keep all those tiny air bubbles for the creamiest, fluffiest result.
Step 5: Assemble the Tacos
Once your cereal shells have become crisp and sturdy, lift them from their molds. Spoon—or pipe, for extra flair—the cheesecake filling into each shell, letting it mound generously in the center. The contrast of cold, crunchy shell and pillowy cheesecake is just swoon-worthy.
Step 6: Garnish and Serve
Just before serving, shower the tops of your tacos with a handful of extra fruity cereal. Not only is it a visual knockout, but it adds more texture and amplifies that classic cereal flavor. Enjoy immediately, or chill for a firmer bite—the choice is yours!
How to Serve Fruity Pebbles Cheesecake Tacos
Garnishes
Go all out with garnish! A final handful of fruity cereal scattered on top brings an extra pop of color and crunch that’s super fun for everyone. You could also add a dollop of fresh whipped cream or a drizzle of raspberry sauce for even more pizazz. For special occasions, try a sprinkle of edible glitter—the kids (and let’s be honest, the adults) will go wild!
Side Dishes
Although Fruity Pebbles Cheesecake Tacos love the spotlight, they pair delightfully with simple sides like fresh fruit salad or a scoop of vanilla bean ice cream. If you want a fun brunch spread, serve alongside mini pancakes, or keep things casual with milkshakes—the possibilities are as cheerful as the tacos themselves.
Creative Ways to Present
Serve Fruity Pebbles Cheesecake Tacos on a colorful platter for party wow-factor. Arrange them upright in a taco holder if you have one, or nestle them in a bed of extra cereal for a playful, edible display. For kids’ parties, set up a taco “bar” with a variety of toppings—like sprinkles, chocolate chips, or fresh berries—and let everyone build their own vibrant masterpiece.
Make Ahead and Storage
Storing Leftovers
If you’re lucky enough to have leftovers, store filled Fruity Pebbles Cheesecake Tacos in an airtight container in the fridge. They’re best eaten within a day, as the shells will begin to soften—but even slightly softened, they’re a treat! For maximum crunch, consider storing empty shells and filling separately, then assembling just before serving.
Freezing
While freezing is possible, keep in mind the texture will change. The cheesecake filling holds up well, but the cereal shell may lose its signature crispness. Still, if you must freeze, wrap each taco tightly in plastic and freeze for up to one month. Let them thaw in the fridge before eating.
Reheating
These beauties are made to be enjoyed cold from the fridge, but if you need to revive them a little, let them sit at room temperature for 10 minutes before serving. Avoid microwaving, as it can melt the filling and make your shells soggy.
FAQs
Can I use a different type of cereal for the shell?
Absolutely! While the rainbow vibes of Fruity Pebbles Cheesecake Tacos are unbeatable, you can swap in other colorful cereals like Trix or even Cocoa Pebbles for a chocolaty twist. The method stays the same—just follow your creative cravings.
Is there a way to make these tacos ahead for a party?
Yes! Prepare the shells and cheesecake filling up to a day in advance. Store the shells at room temperature in a sealed container and the filling in the fridge. Assemble them right before guests arrive to keep everything as crunchy as possible.
Can I make this recipe gluten-free?
Check your cereal packaging—some fruity cereals are gluten-free, but always double-check the label. The rest of the ingredients in Fruity Pebbles Cheesecake Tacos are naturally gluten-free, so this can be a great option for friends with dietary restrictions!
What if I don’t have taco molds or a muffin tin?
No problem! Press the cereal mixture into circles on a parchment-lined baking sheet, then gently bend each one into a taco shape with your hands as they begin to set. It might take a little finesse, but the result is just as delicious.
How can I make these dairy-free?
There are great plant-based substitutes—swap in your favorite vegan cream cheese and whipped topping. Use a plant-based butter alternative to bind the shell, and enjoy dairy-free Fruity Pebbles Cheesecake Tacos that are just as show-stopping!
Final Thoughts
Fruity Pebbles Cheesecake Tacos are pure, joyful dessert magic—each bite guaranteed to make you smile. If you’re ready to bring more color and fun into your kitchen (and onto your dessert table), give this unique treat a try. There’s nothing quite like seeing friends light up as you serve these playful, unforgettable tacos. Go on, give them a whirl—you’ll wonder how you ever had a party without them!
PrintFruity Pebbles Cheesecake Tacos Recipe

These Fruity Pebbles Cheesecake Tacos are a fun and colorful twist on traditional cheesecake. With a crunchy fruity cereal shell and a creamy cheesecake filling, they are sure to delight both kids and adults alike.
- Prep Time: 20 minutes
- Cook Time: 0 minutes
- Total Time: 50 minutes
- Yield: 8 tacos 1x
- Category: Dessert
- Method: Chilling, Mixing, Assembling
- Cuisine: American
- Diet: Vegetarian
Ingredients
For the Crunchy Shell:
- 3 cups fruity cereal
- 1/2 cup unsalted butter, melted
For the Cheesecake Filling:
- 8 oz cream cheese, softened to room temperature
- 1/2 cup powdered sugar, sifted
- 1 tsp pure vanilla extract
- 1 cup whipped cream
- Additional fruity cereal for garnish
Instructions
- Prepare the Crunchy Shell – Combine the fruity cereal and melted butter in a mixing bowl. Stir thoroughly until every piece is evenly coated.
- Shape Your Shells – Press the cereal mixture firmly into small taco-shaped molds or muffin tins. Compact tightly and chill in the refrigerator for at least 30 minutes.
- Whisk Up the Cheesecake Filling – Using a hand mixer, beat the cream cheese until light and fluffy. Gradually add powdered sugar and vanilla extract, blending until smooth.
- Add Airiness – Gently fold whipped cream into the cream cheese mixture, using a spatula to maintain a light texture.
- Assemble the Tacos – Once the cereal shells are firm, spoon the cheesecake filling into each shell generously.
- Garnish and Serve – Sprinkle additional fruity cereal over the filled shells. Serve immediately or chill for a firmer texture.
Nutrition
- Serving Size: 1 taco
- Calories: 280
- Sugar: 18g
- Sodium: 180mg
- Fat: 20g
- Saturated Fat: 12g
- Unsaturated Fat: 6g
- Trans Fat: 0g
- Carbohydrates: 22g
- Fiber: 1g
- Protein: 4g
- Cholesterol: 55mg
Keywords: Fruity Pebbles, Cheesecake Tacos, Dessert, Fruity Cereal, No-Bake


